
Building your first Solid app
This tutorial creates an introductory application that uses Inrupt’s JavaScript Client Libraries to read and write your name to your user profile.
Note: Although this tutorial uses Inrupt’s JavaScript libraries, you can use other libraries (be it for JavaScript or other languages) that support Solid. For more information, see the Solid Developer Tools & Libraries.
This tutorial uses npm and Parcel
to run the application locally on localhost:1234.
You can also try out the application in CodeSandbox.
Inside CodeSandbox, rather than running the application in the embedded browser, open the application in a new window to be able to log in.

Prerequisites
Your own Pod and WebID
Before you start, make sure you have your own Pod and WebID.
Install npm
If you don’t already have npm installed, follow the appropriate instructions
at the Get npm! site. npm is installed as part of the
Node.js installation.
Build the Application
1. Initialize the Application
-
Create a directory for the application:
mkdir my-demo-app -
Go into the newly created directory:
cd my-demo-app -
Create a brand new application (Omit the
--yesto override the default values):npm init --yes
2. Install the Inrupt Client Libraries
Use npm to install Inrupt client libraries:
npm install @inrupt/solid-client @inrupt/solid-client-authn-browser @inrupt/vocab-common-rdf
3. Install Parcel
-
Use
npmto installParcel:npm install parcel-bundler -
Edit the
package.jsonfile to list the browsers supported by this application. Specifically, add thebrowserslistfield and value:TIP: Be sure to add the comma after the preceding field before adding the
browserslistfield."dependencies": { ... }, "browserslist": [ "last 3 and_chr versions", "last 3 chrome versions", "last 3 opera versions", "last 3 ios_saf versions", "last 3 safari versions", "last 3 edge versions" ]Without the
browserslistspecification, Parcel would need to inject a compatibility layer to avoid aregeneratorRuntimereference error since our sample application usesasyncfunctions.As an alternative to modifying the
package.jsonfile, you could importregenerator-runtime/runtimein your JavaScript code, which will inject a suitable compatibility layer.
4. Create the Application
In the my-demo-app directory, create the files for the application.
-
Create a
my-demo.cssfile with the following content:h2, h3 { margin: 1rem 1.2rem 1rem 1.4rem; } header { border-bottom: #5795b9 solid; padding-left: 0.5rem; } .panel { border: 1px solid #005b81; border-radius: 4px; box-shadow: rgb(184, 196, 194) 0px 4px 10px -4px; box-sizing: border-box; padding: 1rem 1.5rem; margin: 1rem 1.2rem 1rem 1.2rem; } #login { background: white; } #read { background: #e6f4f9; } .labelStatus[role="alert"] { padding-left: 1rem; color: purple; } .display { margin-left: 1rem; color: gray; } dl { display: grid; grid-template-columns: max-content auto; } dd { font-weight: bold; } -
Create an
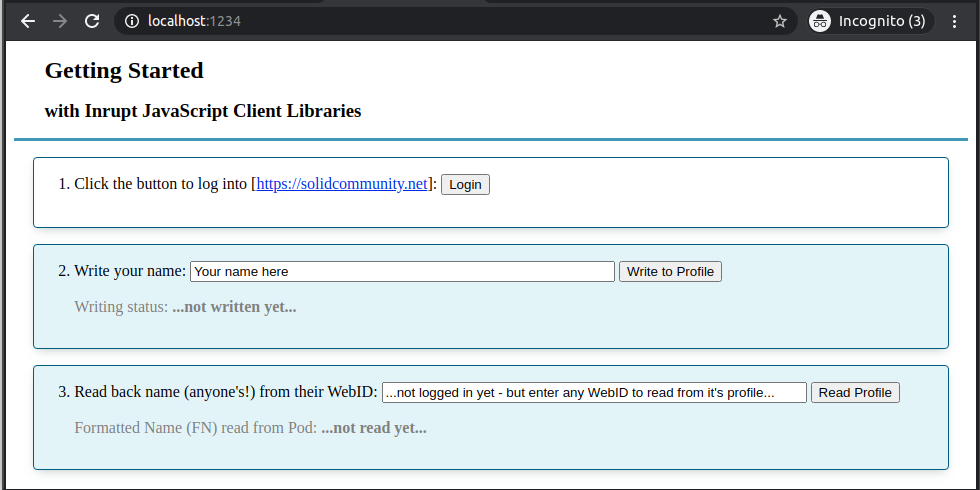
index.htmlfile with the following content:<!DOCTYPE html> <html> <head> <meta charset="utf-8" /> <title>Getting Started: Inrupt JavaScript Client Libraries</title> <script defer src="./index.js"></script> <link rel="stylesheet" href="my-demo.css" /> </head> <body> <header> <h2>Getting Started</h2> <h3>with Inrupt JavaScript Client Libraries</h3> </header> <section id="login" class="panel"> <div class="row"> <label id="labelLogin" for="btnLogin" >1. Click the button to log into <span id="solid_identity_provider" >...provided by the JavaScript code...</span >: </label> <button name="btnLogin" id="btnLogin">Login</button> <p id="labelStatus" class="labelStatus"></p> </div> </section> <div id="read" class="panel"> <div class="row"> <form id="writeForm"> <label id="writelabel" for="input_name">2. Write your name: </label> <input type="text" id="input_name" name="name" size="50" placeholder="Your name here" /> <button type="submit"> Write to Profile </button> </form> </div> <dl class="display"> <dt>Writing status: </dt> <dd id="labelWriteStatus" class="labelStatus">...not written yet...</dd> </dl> </div> <div id="read" class="panel"> <div class="row"> <form id="readForm"> <label id="readlabel" for="webID" >3. Read back name (anyone's!) from their WebID: </label> <input type="url" id="webID" name="webID" size="50" placeholder="...not logged in yet - but enter any WebID to read from its profile..." /> <button type="submit" name="btnRead" id="btnRead"> Read Profile </button> </form> </div> <dl class="display"> <dt>Formatted Name (FN) read from Pod: </dt> <dd id="labelFN">...not read yet...</dd> </dl> </div> </body> </html> -
Create an
index.jsfile with the following content:NOTE: If your Pod is not on
https://solidcommunity.net, modify the value of theSOLID_IDENTITY_PROVIDERvariable accordingly.import { getSolidDataset, getThing, setThing, getStringNoLocale, setStringNoLocale, saveSolidDatasetAt } from "@inrupt/solid-client"; import { Session } from "@inrupt/solid-client-authn-browser"; import { VCARD } from "@inrupt/vocab-common-rdf"; // If your Pod is *not* on `solidcommunity.net`, change this to your identity provider. const SOLID_IDENTITY_PROVIDER = "https://solidcommunity.net"; document.getElementById( "solid_identity_provider" ).innerHTML = `[<a target="_blank" href="${SOLID_IDENTITY_PROVIDER}">${SOLID_IDENTITY_PROVIDER}</a>]`; const NOT_ENTERED_WEBID = "...not logged in yet - but enter any WebID to read from its profile..."; const session = new Session(); const buttonLogin = document.getElementById("btnLogin"); const writeForm = document.getElementById("writeForm"); const readForm = document.getElementById("readForm"); // 1a. Start Login Process. Call session.login() function. async function login() { if (!session.info.isLoggedIn) { await session.login({ oidcIssuer: SOLID_IDENTITY_PROVIDER, clientName: "Inrupt tutorial client app", redirectUrl: window.location.href }); } } // 1b. Login Redirect. Call session.handleIncomingRedirect() function. // When redirected after login, finish the process by retrieving session information. async function handleRedirectAfterLogin() { await session.handleIncomingRedirect(window.location.href); if (session.info.isLoggedIn) { // Update the page with the status. document.getElementById( "labelStatus" ).innerHTML = `Your session is logged in with the WebID [<a target="_blank" href="${session.info.webId}">${session.info.webId}</a>].`; document.getElementById("labelStatus").setAttribute("role", "alert"); document.getElementById("webID").value = session.info.webId; } } // The example has the login redirect back to the index.html. // This calls the function to process login information. // If the function is called when not part of the login redirect, the function is a no-op. handleRedirectAfterLogin(); // 2. Write to profile async function writeProfile() { const name = document.getElementById("input_name").value; if (!session.info.isLoggedIn) { // You must be authenticated to write. document.getElementById( "labelWriteStatus" ).textContent = `...you can't write [${name}] until you first login!`; document.getElementById("labelWriteStatus").setAttribute("role", "alert"); return; } const webID = session.info.webId; // The WebID can contain a hash fragment (e.g. `#me`) to refer to profile data // in the profile dataset. If we strip the hash, we get the URL of the full // dataset. const profileDocumentUrl = new URL(webID); profileDocumentUrl.hash = ""; // To write to a profile, you must be authenticated. That is the role of the fetch // parameter in the following call. let myProfileDataset = await getSolidDataset(profileDocumentUrl.href, { fetch: session.fetch }); // The profile data is a "Thing" in the profile dataset. let profile = getThing(myProfileDataset, webID); // Using the name provided in text field, update the name in your profile. // VCARD.fn object is a convenience object that includes the identifier string "http://www.w3.org/2006/vcard/ns#fn". // As an alternative, you can pass in the "http://www.w3.org/2006/vcard/ns#fn" string instead of VCARD.fn. profile = setStringNoLocale(profile, VCARD.fn, name); // Write back the profile to the dataset. myProfileDataset = setThing(myProfileDataset, profile); // Write back the dataset to your Pod. await saveSolidDatasetAt(profileDocumentUrl.href, myProfileDataset, { fetch: session.fetch }); // Update the page with the retrieved values. document.getElementById( "labelWriteStatus" ).textContent = `Wrote [${name}] as name successfully!`; document.getElementById("labelWriteStatus").setAttribute("role", "alert"); document.getElementById( "labelFN" ).textContent = `...click the 'Read Profile' button to to see what the name might be now...?!`; } // 3. Read profile async function readProfile() { const webID = document.getElementById("webID").value; if (webID === NOT_ENTERED_WEBID) { document.getElementById( "labelFN" ).textContent = `Login first, or enter a WebID (any WebID!) to read from its profile`; return false; } try { new URL(webID); } catch (_) { document.getElementById( "labelFN" ).textContent = `Provided WebID [${webID}] is not a valid URL - please try again`; return false; } const profileDocumentUrl = new URL(webID); profileDocumentUrl.hash = ""; // Profile is public data; i.e., you do not need to be logged in to read the data. // For illustrative purposes, shows both an authenticated and non-authenticated reads. let myDataset; try { if (session.info.isLoggedIn) { myDataset = await getSolidDataset(profileDocumentUrl.href, { fetch: session.fetch }); } else { myDataset = await getSolidDataset(profileDocumentUrl.href); } } catch (error) { document.getElementById( "labelFN" ).textContent = `Entered value [${webID}] does not appear to be a WebID. Error: [${error}]`; return false; } const profile = getThing(myDataset, webID); // Get the formatted name (fn) using the property identifier "http://www.w3.org/2006/vcard/ns#fn". // VCARD.fn object is a convenience object that includes the identifier string "http://www.w3.org/2006/vcard/ns#fn". // As an alternative, you can pass in the "http://www.w3.org/2006/vcard/ns#fn" string instead of VCARD.fn. const formattedName = getStringNoLocale(profile, VCARD.fn); // Update the page with the retrieved values. document.getElementById("labelFN").textContent = `[${formattedName}]`; } buttonLogin.onclick = function () { login(); }; writeForm.addEventListener("submit", (event) => { event.preventDefault(); writeProfile(); }); readForm.addEventListener("submit", (event) => { event.preventDefault(); readProfile(); });
Run the Application
-
In the
my-demo-appdirectory, run:npx parcel index.htmlThe output should resemble the following:
Server running at http://localhost:1234 ... Built in 2ms. -
Open
localhost:1234in a browser. -
Click the
Loginbutton.-
The first time you log into your Pod with this application (it’ll be named
http://localhost:1234), you’ll be prompted to authorize it to access your Pod . To allow the application to read and write to your Pod, clickAuthorize. -
If you have logged out of your Pod, you are prompted to log in. Enter your username and password to log in.
-
Once logged in, you should be redirected back to the client application.
Back in the application, you should see a message stating
Your session is logged in with the WebID [<your WebID>].and the WebID textfield should display your WebID.
-
-
Now that you’re logged in, you can read and write the information in your Solid profile.
-
First, click the
Read Profilebutton.You should see the name you entered when you registered your Pod.
-
To update your name, enter a new name in the
2. Write your nametextfield, and click theWrite to Profilebutton. You should see the message:Wrote [<your new name>] as name successfully! -
Verify that your profile was updated by clicking on the
Read Profilebutton again. You should see the updated name displayed!
You can also read the public profiles of anyone else in the world with a Solid Pod. Enter the WebID of the person whose profile you wish to read; e.g.,
https://docs-example.inrupt.net/profile/card#me. -
-
Exit the Application. To exit the application, stop the
npx parcelprocess; e.g.,Ctrl-C.
Additional Information
API Documentation
For more information on the functions: